
1、FastDFS分布式文件系统介绍
FastDFS是一个开源的分布式文件系统,她对文件进行管理,功能包括:文件存储、文件同步、文件访问(文件上传、文件下载)等,解决了大容量存储和负载均衡的问题。特别适合以文件为载体的在线服务,如相册网站、视频网站等等。
FastDFS服务端有两个角色:跟踪器(tracker)和存储节点(storage)。跟踪器主要做调度工作,在访问上起负载均衡的作用。
存储节点存储文件,完成文件管理的所有功能:存储、同步和提供存取接口,FastDFS同时对文件的meta data进行管理。所谓文件的meta data就是文件的相关属性,以键值对(key value pair)方式表示,如:width=1024,其中的key为width,value为1024。文件meta data是文件属性列表,可以包含多个键值对。
FastDFS系统结构如下图所示:
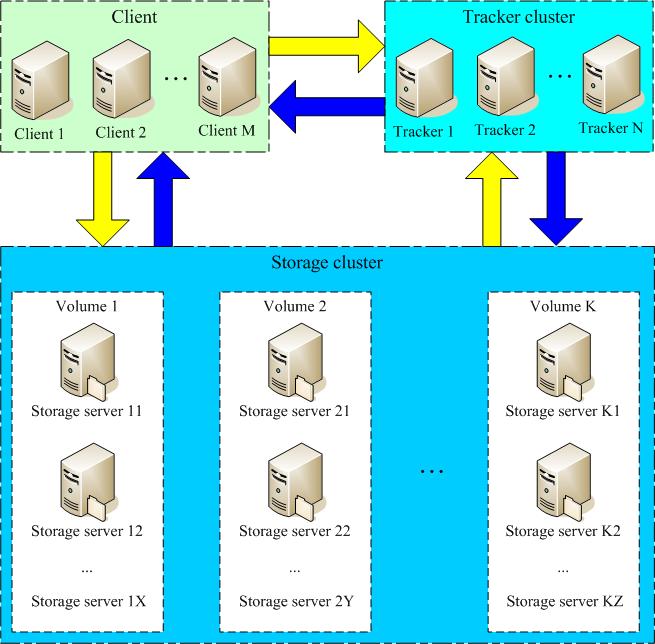
2、分布式文件系统安装部署:
1、确定安装位置,设置tracker和storage日志和数据存储位置:
1)、创建/usr/local/fastdfs目录安装fastdfs
2)、创建/usr/local/nginx目录安装nginx
2)、创建/home/fastdfs/tracker目录tracker使用
3)、创建/home/fastdfs/storage目录存放storage交换日志文件
2、安装libfastcommon-1.0.7:
1)、解压V1.0.7.tar.gz,首次安装可能会提示部分软件未安装,一次安装即可。
2)、进入解压目录一次执行./make.sh 和./make.sh install,执行命令如下:
执行./make.sh 如果出现上边错误,安装gcc
再次执行./make.sh,完成后执行./make.sh install,出现如下结果安装成功
3)、注意,上述安装路径在/usr/lib64,但是FastDFS主程序设置的lib目录是/usr/local/lib,所以需要创建 软连接如下:
ln -s /usr/lib64/libfastcommon.so /usr/local/lib/libfastcommon.so
ln -s /usr/lib64/libfastcommon.so /usr/lib/libfastcommon.so
ln -s /usr/lib64/libfdfsclient.so /usr/local/lib/libfdfscommon.so
ln -s /usr/lib64/libfdfsclient.so /usr/lib/libfdfscommon.so
2、安装libevent()
3、安装FastDFS:
1)、解压fastdfs-5.05.tar.gz 到/usr/local/fastdfs目录
2)、执行make.sh 和make.sh安装fastdfs,安装之后会在/etc/fdfs目录下生成 tracker.conf、storage.conf、client.conf
3)、配置tracker
# is this config file disabled
# false for enabled
# true for disabled
disabled=false
# bind an address of this host
# empty for bind all addresses of this host
bind_addr=192.168.2.111
# the tracker server port
port=22122
# connect timeout in seconds
# default value is 30s
connect_timeout=30
# network timeout in seconds
# default value is 30s
network_timeout=60
# the base path to store data and log files 此处为先前创建的目录
base_path=/home/fastdfs/tracker #设置tracker日志文件位置
# max concurrent connections this server supported
max_connections=256
# accept thread count
# default value is 1
# since V4.07
accept_threads=1
# work thread count, should <= max_connections
# default value is 4
# since V2.00
work_threads=4
# the method of selecting group to upload files
# 0: round robin
# 1: specify group
# 2: load balance, select the max free space group to upload file
store_lookup=2
# which group to upload file
# when store_lookup set to 1, must set store_group to the group name
store_group=group1
# which storage server to upload file
# 0: round robin (default)
# 1: the first server order by ip address
# 2: the first server order by priority (the minimal)
store_server=0
。。。。。其他不需要配置
4)、配置storage.conf和tracker.conf比较像,绑定ip修改端口,配置tracker_server,配置存储位置等,主要配置以下信息:
disabled=false
group_name=group1
bind_addr=192.168.2.111 #ip为本机ip地址
port=23000
base_path=/home/fastdfs/storage #此处使用文件目录为之前创建目录 存储日志文件信息
store_path0=/home/fastdfs #会在此目录生成data目录
tracker_server=192.168.2.111:22122 #tracker地址为启动的tracker_server地址 可以是多个
5)、配置client.conf ,配置下边两项即可
base_path=/home/fastdfs/client
tracker_server=192.168.2.111:22122
6)、启动tracker和storage
启动tracker:
启动storage:
测试是否启动成功 出现如下界面,即启动成功:
4、配置FastDFS环境Linux支持:
1)、安装fastdfs-nginx-module
tar -xvf fastdfs-nginx-module_v1.16.tar.gz
cd fastdfs-nginx-module/src
修改如下配置,我这里原来是
CORE_INCS="$CORE_INCS /usr/local/include/fastdfs /usr/local/include/fastcommon/"
改成
CORE_INCS="$CORE_INCS /usr/include/fastdfs /usr/include/fastcommon/"
这个是很重要的,不然在nginx编译的时候会报错的,我看网上很多在安装nginx的fastdfs的插件报错,都是这个原因,而不是版本不匹配。
cp mod_fastdfs.conf /etc/fdfs
修改配置如下:
group_name=group1
tracker_server=192.168.2.111:22122 #可以是多个
store_path0=/home/fastdfs
base_path=/home/fastdfs/nginx # 运行数据文件
url_have_group_name = true
2)、配置文件服务器的软连接
ln -s /home/fastdfs/data /home/fastdfs/data/M00 (配置文件中stoage存放数据的路径)
同时将以下两个文件复制到/etc/fdfs/
cp /usr/local/fastdfs/http.conf /etc/fdfs/
cp /usr/local/fastdfs/mime.types /etc/fdfs/
3)、安装nginx,在每个storage服务器上安装nginx:
解压nginx安装包,进入:
执行命令安装
./configure --prefix=/usr/local/nginx/ --add-module=/root/fastdfs-nginx-module/src --without-http_rewrite_module --without-http_gzip_module 模块解压位置
make
make install
cd /usr/local/nginx/conf
vi nginx.conf
添加一下内容:
location /group1/M00{
root /home/fastdfs/data;
ngx_fastdfs_module;
}
注意:安装过程中可能会存在依赖未安装情况,更具提示安装即可
启动:
/usr/local/nginx/sbin/nginx
5、多tracker 、多storage、多group实现,下边用两个节点实现集群配置:
1)、多tracker配置
多个tracker是对等的,相互之间独立,通过storage中配置多个tracker_server实现
2)、过group配置
group相当于分组不同分组设置相同的group_name,每个分组中可以有多个storage设置storage.conf配置文件中group_name值相同
3)、一个group中多storage配置实现
搭建storage时 配置storage.conf文件设置group_name相同,则多个storage属于同一个group
nginx配置访问本storage服务存储位置
6、实际生产环境中使用配置:
在在每个storage节点上安装nginx提供文件访问,之后安装单独的nginx服务器作为负责均衡和反向代理服务,为每个不同group_name 配置不同upstream即可
3、分布式文件系统使用(java):
访问 下载使用Apache和nginx扩展实现,
上传功能通过FastDFS java client客户端实现
首先安装 Fastdfs-java-client 到本地仓库中,在项目中添加如下依赖:
4、备注(安装过程中从一些资料看到的问题):
1、nginx扩展 能解决数据同步问题,如果在指定地址未找到文件,则会重定向到源storage
2、storage自带web server功能,但是一般不要使用使用扩展 Apache和nginx
5、待解决问题:
1、tracker中web server使用
2、storage中web server使用


相关推荐
摘要: FastDFS简介 •FastDFS是一个轻量级的开源分布式文件系统 •FastDFS主要解决了大容量的文件存储和高并发访问的问题,文件存取时实现了负载均衡 •FastDFS实现了软件方式的RAID,可以使用廉价的IDE硬盘进行...
3.能够理解FastDFS分布式文件系统架构、及架构思想 4.能够理解文件上传、下载、 文件服务器访问的流程 5.能够完成FastDFS环境搭建(使用docker镜像即可) 6.能够理解FastDFS&nginx访问流程 7.能够掌握FastDFS错误...
快速构建分布式文件系统,快速构建分布式文件系统,快速构建分布式文件系统
FastDFS分布式文件系统的安装与使用
其中包括FastDFS安装包,各个配置文件的配置,以及Java客户端操作FastDFS的使用。
FastDFS分布式文件系统分析
本系统使用FastDFS分布式文件系统作为本系统的图片服务器,需自行安装虚拟机进行配置。 一个本科毕业设计项目,基于springboot的论坛管理系统,前后端,源码+数据库 技术栈: SpringBoot+SpringSecurity+Maven+...
基于FastDFS分布式文件系统的测试Demo,可以进行FastDFS分布式文件系统部署后的测试
FastDFS和Linux下安装使用FastDFS 安装Nginx 分布式文件系统
fastDFS分布式文件系统部署方案,详细部署步骤,一看便知; FastDFS 是一个开源的高性能分布式文件系统( DFS )。 它的主要功能包括:文件存储,文件同步和 文件访问,以及高容量和负载平衡。主要解决了海量数据...
FastDFS是一款分布式文件系统,功能主要包括:文件存储、文件同步、文件访问(文件上传、文件下载)等,解决了文件大容量存储和 高性能访问的问题。FastDFS特别适合以文件为载体的在线服务,如图片、视频、文档等等...
fastDFS分布式文件系统安装包集合
FastDFS 分布式文件系统实现了文件多台服务器之间分布式存储,附件为 tracker、storage、mod_fastdfs、nginx 软件及详情的安装、配置步骤说明
爽!FastDFS分布式文件系统这么玩儿,省时省力!附测试源码
FastDFS分布式文件系统搭建
直接调用工具类,返回参数即为fastdfs分布式文件系统的存储路径
FastDFS分布式文件系统 v6.12.0.zip
2、FastDFS分布式文件系统集群与应用
FastDFS分布式文件系统单机容器化部署,集群容器化部署 使用方法见:https://blog.csdn.net/pcn01/article/details/104464689
go-fastdfs分布式文件系统 v1.4.3.zip